Using Let's Encrypt SSL Certificates on a Shared Host
Table of Contents
This post describes how I use my Linux workstation at home to manage Let’s Encrypt SSL certificates which are deployed on the shared virtual host hosting this web site.
In contrast to a dedicated virtual host, on a shared virtual host you cannot install the Let’s Encrypt software because you don’t have access to the virtual host’s root account. Therefore, and unless your Internet Service Provider (ISP) supports Let’s Encrypt directly, which is not my case, you have to manage the certificates for the shared host on a different computer.
In what follows, I refer to the server provided by my ISP as the server, which in my case is running an old version of CentOS. I use the term workstation to refer to my Linux workstation at home, which is currently running Ubuntu Linux 18.04 LTS.
The goal is to get the https://fosstel.com site to work with an SSL certificate from Let’s Encrypt. Requesting and renewing the certificate is done on the workstation, while installing the certificate is done on the server, which is where the web site is running.
Table of Contents
- Prerequisites
- Installing Let’s Encrypt on Your Workstation
- Requesting a New SSL Certificate
- Uploading and Installing the SSL Certificate
- Testing The SSL Certificate
- Renewing The SSL Certificate
- Pre, Post, and Deploy Renewal Hooks
- Cron Job
- Summary
Prerequisites #
Before getting into the details of managing the SSL certificates you must be able to do the following:
-
Upload files from the workstation to the server without using passwords. That is, you need to have SSH password-less access to the server.
-
Create verification files on the server, and retrieve them via HTTP from the web site. The URL used to retrieve the verification files must include the DNS domain name for which you want the SSL certificate,
fosstel.comin my case.
With these two capabilities you can use Let’s Encrypt’s certbot command to
verify automatically that you have control over the DNS domain you are
requesting certificates for. This is a certbot requirement before it can issue
any certificates. Using verification files is part of the certbot’s http
method of verification, which I use because is simple, but there are others.
Let’s see some details on the prerequisites.
First, you need to configure password-less access on the server using your SSH keys. There are plenty of tutorials on how to do this so I will skip the details. Password-less access is needed for the validation scripts described below to be able to upload files to the server without manual intervention.
One thing I noticed when testing file uploads from my workstation to the server was the following error message displayed on the console:
$ scp test.txt fosstel:
stdin: is not a tty
This was happening because the login scripts on the server were set up to work
with an interactive login shell, but an SCP session does not have one. I added
the following line to the ~/.bashrc file on the server to make it go quiet for
non-interactive sessions:
# exit if this is a non-interactive session
[[ $- != *i* ]] && return
Second, log in to the server, go to the root directory where your web site is served from, and create the ACME-challenge directory. Here are the example commands from my workstation:
$ ssh fosstel
<server>$ cd public_html/
<server>$ mkdir -p .well-known/acme-challenge
Note that I created the .well-known/acme-challenge directory at the root of
the web site space (~/public_html), or at the web-root path “/” when serving
pages over HTTP. You will have to tell certbot what the root path is inside
your web space in case you create this directory somewhere else.
Third, configure your web server to ensure that you can retrieve files from the ACME-challenge directory using HTTP GET requests, for example, http://fosstel.com/.well-known/acme-challenge/12345. In my case, I didn’t need any configuration, but your millage may vary depending on the web server you use or other software you may have running.
Installing Let’s Encrypt on Your Workstation #
You need to install Let’s Encrypt software on the workstation to manage the
SSL certificates. Let’s Encrypt for Ubuntu is available from the certbot
PPA, which you can install on the workstation as follows:
$ sudo add-apt-repository ppa:certbot/certbot
$ sudo apt-get update
$ sudo apt-get install letsencrypt
The letsencrypt package includes the certbot command which is the one we are
going to use.
Requesting a New SSL Certificate #
When starting afresh, the first thing you need to do is to request a new SSL certificate for your domain. You can start with a command like the following to understand how the process goes:
$ sudo certbot certonly \
  --manual \
  --cert-name fosstel \
  --preferred-challenges http \
  --manual-public-ip-logging-ok \
  -d fosstel.com \
  --dry-run
certonly: Generate the certificate and keep it in /etc/letsencrypt but do
not install it locally. In our case, all we want to do is to transfer it
over to the server.
--manual: run the domain validation process interactively or using
user-provided scripts. You need this option to be able to request or renew
certificates on a machine other that the target web server. For more details see
manual mode.
--cert-name: The name of the certificate. It is also used to generate the
names of the certificate files.
--preferred-challenges: Use the http domain validation method. Using this
method you are requested to make verification files available on the web
server to confirm that you control the DNS domain.
--manual-public-ip-logging-ok: Let’s Encrypt asks you to allow recording
the IP address where this command if run from. Using this option you are
pre-answering this question positively so you don’t have to answer it manually.
-d: A comma-separated list of DNS domains the certificate should be valid for.
--dry-run: Go to the process without actually creating any certificates. Once
you finish testing that the certbot command runs as expected, you should run
it again without this option to get the actual certificate.
I’ll spare the details, but once you run this command, certbot verifies that
you have control of the domain fosstel.com by asking you to place a file with
some random content on the ACME-challenge directory of your web server, and to
make it available over HTTP. As is, this is a manual process where you have to
log in to the server and create the verification file requested by certbot on
the workstation’s console.
Once the verification file is available, a Let’s Encrypt ACME server somewhere
retrieves the validation file, verifies its content, and confirms the action
with the certbot command. certbot then proceeds to create the certificate
and to store it locally on the workstation. Thereafter you have to upload the
certificate to the server and do whatever is required there to install it on
your web site.
Pre and Post Validation Hooks #
Certbot allows for the specification of pre and post validation hooks (scripts) when run in manual mode.
Rather than creating the validation files on the server manually, you can
tell certbot to invoke pre and post manual validation scripts to do it for
you. One advantage of doing this is that you can use the same scripts to renew
the certificate, something that you will have to do periodically because the
certificates issued by Let’s Encrypt are valid for 90 days only.
Here is the modified command with the additional options at the end:
$ sudo certbot certonly \
  --manual \
  --cert-name fosstel \
  --preferred-challenges http \
  --manual-public-ip-logging-ok \
  -d fosstel.com \
  --dry-run \
  --manual-auth-hook /usr/local/etc/letsencrypt/renewal-hooks/authorization.sh  \
  --manual-cleanup-hook /usr/local/etc/letsencrypt/renewal-hooks/cleanup.sh
--manual-auth-hook: A script to run before attempting validation of
ACME-directory files. This script has to create the validation file on the
server.
--manual-cleanup-hook: A script to run right after the validation process is
complete. You can use this script to remove the validation file from the
server.
You can place the validation scripts anywhere you please in the workstation.
certbot sets up the CERTBOT_TOKEN and CERTBOT_VALIDATION environment
variables that the authorization script can use to determine exactly what to do.
CERTBOT_TOKEN contains the name of the validation file, and
CERTBOT_VALIDATION contains its expected content. Here is a sample
authorization.sh script:
#!/bin/sh

TOKEN_PATH="public_html/.well-known/acme-challenge/$CERTBOT_TOKEN"
ssh fosstel "echo -n $CERTBOT_VALIDATION > $TOKEN_PATH"
echo $TOKEN_PATH # stdout is passed to the cleanup script
exit 0
The first line configures the full name of the validation file on the server,
having public_html as the root. The second line uses SSH to invoke the echo
command on the server to create the validation file with the expected content.
The third line writes the full path of the validation file to standard output.
certbot passes the standard output from the authorization script to the clean
up script in the CERTBOT_AUTH_OUTPUT environment variable. The sample clean up
script that follows uses this environment variable to remove the validation
file:
#!/bin/sh

ssh fosstel "rm $CERTBOT_AUTH_OUTPUT"
exit 0
Using these two scripts you can run the certbot command unattended to request
certificates using the http validation mode. As you will see below, the
scripts can be used also to renew the certificate.
For more information about using validation scripts see validation hooks.
Querying for Your Certificate #
Once certbot issues the new certificate you can run the following command on
the workstation to get its status:
$ sudo certbot certificates
Saving debug log to /var/log/letsencrypt/letsencrypt.log

-------------------------------------------------------------------------------
Found the following certs:
Certificate Name: fosstel
Domains: fosstel.com
Expiry Date: 2018-07-27 04:15:06+00:00 (VALID: 75 days)
Certificate Path: /etc/letsencrypt/live/fosstel/fullchain.pem
Private Key Path: /etc/letsencrypt/live/fosstel/privkey.pem
-------------------------------------------------------------------------------
The certificate is stored in the directory /etc/letsencrypt/live/fosstel. The
file fullchain.pem contains the server certificate (or end-entity certificate)
followed by any intermediary certificates. The file privkey.pem contains the
certificate’s private key.
For more information about all certificate files generated by Let’s Encrypt see Where are my certificates?.
Uploading and Installing the SSL Certificate #
This is the unfortunate part of the story. To upload new certificates, or to update existing ones, you have to log in to your ISP’s cPanel portal first (or any other administration portal you may have), and then manually fill in the SSL update forms.
For convenience, you can copy the server’s certificate on the workstation to the copy/paste (clip) buffer using the following command:
$ sudo cat /etc/letsencrypt/live/fosstel/fullchain.pem | xclip -selection c
You can copy the certificate’s private key on the workstation using the following command:
$ sudo cat /etc/letsencrypt/live/fosstel/privkey.pem | xclip -selection c
To upload a new certificate select the SSL/TLS >
Certificates (CRT) menu in the cPanel to access the following form:
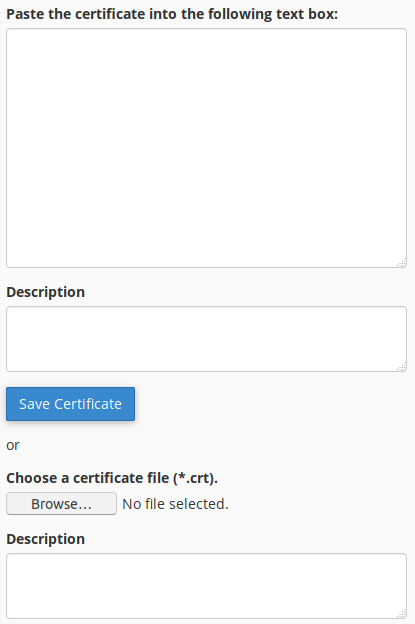
Paste the fullchain clip selection onto the text box, and (optionally) add a
description. The default description is the list of domains covered by the
certificate. Note: only root has access to the certificates on the workstation,
therefore the Browse button cannot be used to access the certificate file
directly, unless you make a copy.
You can save the certificate now.
The next step is to associate the new certificate with the target web site.
Select the SSL/TLS > Install and Manage SSL for your Site (HTTPS) menu to
access the following form:
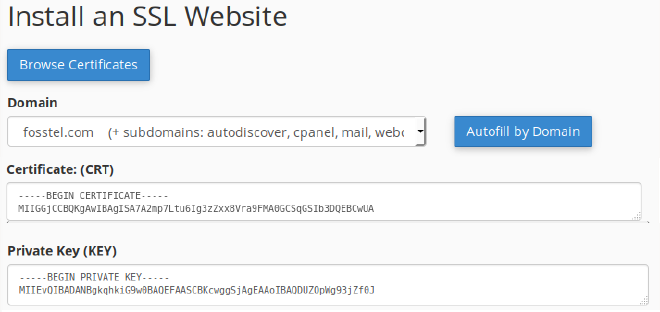
Choose your domain, select the Autofill by Domain button on the right, or
paste the fullchain clip selection onto the Certificate (CRT) part. If you
paste the certificate, keep only the first BEGIN/END certificate block of the
fullchain clip (the server’s certificate) in case there are more than one.
Paste the pivkey clip selection onto the Private Key (KEY) part. You can
install the certificate now.
Keep your SSL certificates clean by making use of the SSL management menus provided by the cPanel, for example, by removing invalid and expired certificates.
Testing The SSL Certificate #
Once the certificate is installed on the server and associated with the web
site, you can use the curl command to verify the secure connection, as
follows:
$ curl -vI https://fosstel.com
...
* SSL connection using TLSv1.2 / ECDHE-RSA-AES256-GCM-SHA384
* ALPN, server accepted to use http/1.1
* Server certificate:
*  subject: CN=fosstel.com
*  start date: Apr 28 04:15:06 2018 GMT
*  expire date: Jul 27 04:15:06 2018 GMT
*  subjectAltName: host "fosstel.com" matched cert's "fosstel.com"
*  issuer: C=US; O=Let's Encrypt; CN=Let's Encrypt Authority X3
*  SSL certificate verify ok.
...
The section on SSL in the output confirms the identity of the certificate.
Renewing The SSL Certificate #
The process of renewing the certificate is almost identical to that of requesting a new one. Let’s Encrypt still goes through the ACME verification process, which includes uploading to and retrieving files from the web server, and running the authorization and clean up scripts when selecting manual operation.
The command to use is basically the same one used to request a certificate, with
the exceptions of using renew instead of certonly, and of not having to
specify the domain with the -d option. You can omit the --cert-name option
also to get certbot to renew all certificates it knows about.
Here is the renew command:
$ sudo certbot renew \
  --manual \
  --cert-name fosstel \
  --preferred-challenges http \
  --manual-public-ip-logging-ok \
  --dry-run \
  --manual-auth-hook ./authorization.sh  \
  --manual-cleanup-hook ./cleanup.sh
Once the renew command is complete, certbot replaces the old certificate in
the directory /etc/letsencrypt/live/fosstel with its updated version.
Thereafter, as before, you have to go through the manual process of uploading
and installing the updated certificate on the server.
Don’t forget to run the renew command without the --dry-run option once you
have verified that it works as expected.
The Renewal Configuration File #
When a certificate is issued, either new or by renewal, certbot creates a
renewal configuration file that tracks the options used when the
command was run. These renewal configuration files are located at
/etc/letsencrypt/renewal/CERTNAME.conf.
Here is a relevant section of the configuration file for fosstel.com:
$ sudo cat /etc/letsencrypt/renewal/fosstel.conf
...
# Options used in the renewal process
[renewalparams]
account = 12345
pref_challs = http-01,
authenticator = manual
installer = None
manual_public_ip_logging_ok = True
manual_auth_hook = /usr/local/etc/letsencrypt/renewal-hooks/authoriztion.sh
manual_cleanup_hook = /usr/local/etc/letsencrypt/renewal-hooks/cleanup.sh
Because certbot remembers the last command options used when issuing a
certificate, you can use a short command form the next time you renew the
certificate, as follows:
$ sudo certbot renew --cert-name fosstel
You can omit the certificate name also, as certbot will attempt to renew all
certificates by default.
Pre, Post, and Deploy Renewal Hooks #
certbot supports pre, post, and deploy hooks when obtaining or renewing
certificates, that is, when using the command’s certonly and renew options.
We refer to these hooks as renewal hooks, which are different from the
validation hooks for manual processing described before.
A pre hook can be invoked using the --pre-hook option, and it is called only
if a certificate is actually going to be obtained or renewed. A post hook can
be invoked using the --post-hook option, an it is called only if an attempt
was made to obtain or renew a certificate. We don’t use pre and post hooks in
this shared host use case.
The deploy hook can be invoked using the --deploy-hook option, and it is
called once for each successfully issued certificate. We can use this hook to
get the workstation to send an email telling us about the successful renewal of
the fosstel.com certificate. We will know then that it is time to do the
manual upload and installation of the certificate on the server.
The command to renew the certificate and send an email upon successful renewal is then the following:
$ sudo certbot renew \
  --cert-name fosstel \
  --deploy-hook /usr/local/etc/letsencrypt/renewal-hooks/deploy.sh
Here is a sample deploy script:
#!/bin/sh

/usr/sbin/sendmail pedro.sanchez@fosstel.com <<EOF
To: pedro.sanchez@fosstel.com
From: pedro.sanchez@fosstel.com
Subject: Letsencryt Alert

Renewed certificates for $RENEWED_DOMAINS are ready for upload from $RENEWED_LINEAGE.
EOF
For the deploy hook, the shell variable RENEWED_LINEAGE points to the config
live subdirectory /etc/letsencrypt/live/fosstel.com containing the new
certificates and keys; the shell variable RENEWED_DOMAINS contains a
space-delimited list of renewed certificate domains.
Note: The sendmail binary on my workstation is really the
ssmtp MTA agent which I use to
send email alerts.
Pre, post, and deploy hooks can be placed in the
/etc/letsencrypt/renewal-hooks/{pre,post,deploy} directories as well, which
may be more convenient than specifying them explicitly in the certbot command
line.
For more on renewal hooks see Renewing
Certificates and
the certbot man page.
Testing the Deploy Hook #
certbot skips running the deploy hook when you use the --dry-run option,
which is a sensible thing to do given the fact that no certificates are issued
in this case. But you can test the deploy script using it as a post hook, which
is invoked always after a renewal attempt. Use the following command for
testing:
$ sudo certbot renew \
  --cert-name fosstel \
  --dry-run \
  --post-hook /usr/local/etc/letsencrypt/renewal-hooks/deploy.sh
Unfortunately the RENEWED_LINEAGE and RENEWED_DOMAINS environment variables
are not provided to the post hook, so the test email you get will have empty
spaces in their place. But at least you can verify that the script is sending
the email to the correct recipient.
Cron Job #
We are almost done. We requested the certificate using the certonly option in
manual mode, which we had to do only once to get the initial certificate; we
then uploaded and installed the certificate on the server.
We also tested a renewal command using the renew option in manual mode, which
we have to use periodically to renew the certificate. Renewing the certificate
can be done in a cron job, daily or weekly; this is the weekly cron job
/etc/cron.weekly/letsencrypt-renewals in my workstation:
#!/bin/sh

/usr/bin/certbot renew \
--quiet \
--deploy-hook /usr/local/etc/letsencrypt/renewal-hooks/deploy.sh
Upon successful renewal of the certificate I am notified via email that I have to upload and install the new certificate on my shared host.
Summary #
In this post we discussed how to:
- Install the Let’s Encrypt software on the workstation.
- Request an SSL certificate using the
certbotcommand with thecertonlyoption in manual mode. This is done only once. - Upload and install the certificate using the cPanel portal on the server.
- Test the certificate.
- Set up a cron job to renew the certificate and to notify you via email about it.
The following script files placed in the
/usr/local/etc/letsencrypt/renewal-hooks directory were used in support of the
certbot manual operations:
authentication.sh: Used to create the ACME verification file on the server.cleanup.sh: Used to remove the ACME verification file from the server.deploy.sh: Used to send the final notification email about a new certificate renewal.
We also created the /etc/cron.weekly/letsencrypt-renewals cron job to check
for renewals every week.