Installing Kubernetes on the Photon OS

Table of Contents
This document collects notes about installing Kubernetes on Photon OS. Project Photon OS™ is an open source, minimal Linux container host that is optimized for cloud-native applications, cloud platforms, and VMware infrastructure.
The target configuration has two nodes, master and worker (a total of two Photon OS VMs). This document is split into three sections: Configuring the master node, configuring the worker node, and running a sample application.
Documentation Sources #
- The official Kubernetes Getting Started guide. In particular, the section Bootstraping clusters with kubeadm, as I use kubeadm to drive the installation process.
- Quickstart for Calico on Kubernetes, as I chose Project Calico for the network plugin.
- Multiple articles on the Internet, specially those about Kubernetes on CentOS, as there are many similarities between the latter and Phonton OS.
The Environment #
My workstation: macOS Catalina v10.15.2. This is where I launch the Photon OS VMs (master and worker Kubernetes nodes).
VMware Fusion Professional Version 11.5.1: I use Fusion to launch and manage the Photon OS VMs.
Photon OS 3.0 revision 2, virtual hardware v11: I downloaded the OVA image from the Photon OS downloads web site.
The Master Node #
This section describes how to configure a Kubernetes master node.
Node Name: kube-master
Node IP Address: 192.168.1.50/24
Download the photon-hw11-3.0-9355405 OVA image and launch it using Fusion. The OVA image comes preloaded with a working hard drive and basic networking.
-
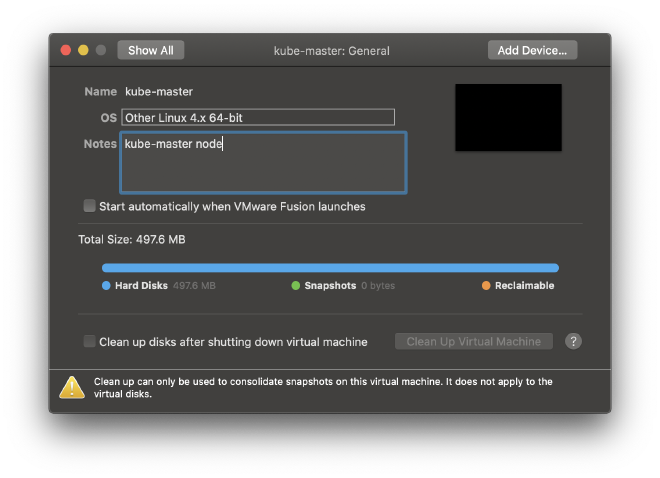
Before launching the VM, enter the General tab of the VM configuration settings in Fusion and set the OS type to Linux 4.x 64-bit, as illustrated below:
-
While launching the VM, Fusion may request permission to take screen shots; accept this request. Otherwise the VM console screen will be plain black.
-
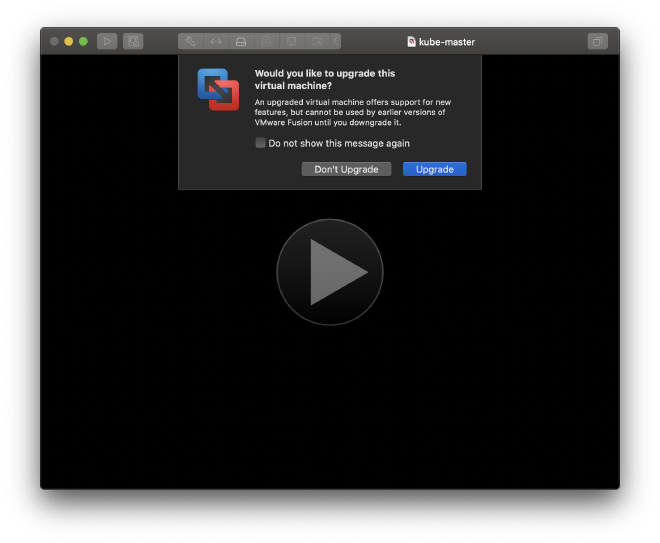
Fusion also asks if you want to upgrade the VM image. I answered Yes:
Once the VM is running you can log in with credentials root/changeme. You are then asked immediately to change the password.
You have now a working Photon OS VM to work with.
Software Upgrade #
Upgrade the software on the VM to incorporate the latest available packages in the Photon OS distribution. Among other upgrades, this step refreshes the Linux kernel and docker packages.
tdnf upgrade
Accept the suggested changes, reboot the VM, and ensure that it boots properly.
reboot
Network Connectivity #
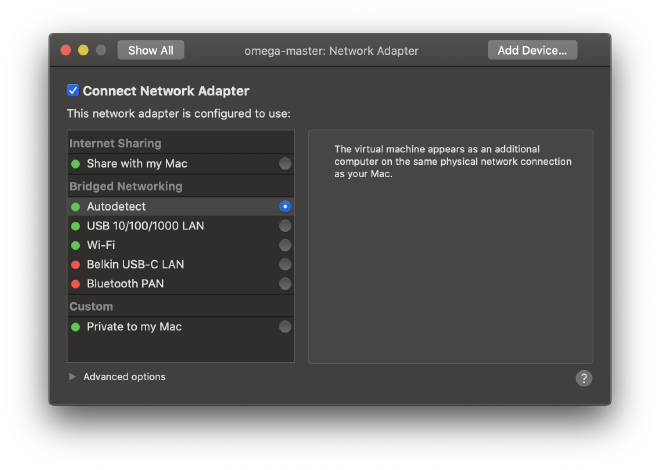
The VM runs in bridge networking mode automatically. This means that it shares the network with the workstation and looks like an additional computer on your network. The following image shows the network adapter state as displayed by Fusion:
In its default configuration the VM uses DHCP to configure the eth0 Ethernet interface, as illustrated below:
ip addr | grep eth0
2: eth0: <BROADCAST,MULTICAST,UP,LOWER_UP> mtu 1500 qdisc fq_codel state UP group default qlen 1000
    inet 192.168.1.223/24 brd 192.168.1.255 scope global dynamic eth0
You must ensure that the VM can reach your default gateway, 192.168.1.1 in my case.
Static IP Address #
Configure the VM to use a static IP address instead so that Kubernetes can use specific addresses.
Master Node IP Address: 192.168.1.50
The following commands create the file 10-static-en.network containing the desired static configuration and restart the VM’s networking stack. Adjust the IP addresses in the Network section to your environment.
cat > /etc/systemd/network/10-static-en.network <<EOF
[Match]
Name=eth0

[Network]
Address=192.168.1.50/24
Gateway=192.168.1.1
DNS=192.168.1.101
EOF

chmod 644 /etc/systemd/network/10-static-en.network

systemctl restart systemd-networkd

ip addr | grep eth0
2: eth0: <BROADCAST,MULTICAST,UP,LOWER_UP> mtu 1500 qdisc fq_codel state UP group default qlen 1000
    inet 192.168.1.50/24 brd 192.168.1.255 scope global eth
Verify that you can ping the Gateway. This document assumes that the gateway gives you access to the Internet.
You can ignore the DNS line in the example above which I use to access my private DNS resolver first. Photon OS is configured to access the Google DNS servers by default.
Host Names #
Change the host name on the VM using the following command:
hostnamectl set-hostname kube-master
To ensure connectivity with the future working node, kube-node01, modify the
file /etc/hosts as follows:
cat /etc/hosts
# Begin /etc/hosts (network card version)
192.168.1.50 kube-master
192.168.1.51 kube-node01

::1         ipv6-localhost ipv6-loopback
127.0.0.1   localhost.localdomain
127.0.0.1   localhost
127.0.0.1   photon-machine
# End /etc/hosts (network card version)
SSH Access #
Having SSH access to the VM from your workstation is convenient. At the very least it allows you to copy/paste code and commands easily, something you can’t do when using the VM console window.
Contrary to what the VMware documentation says, the VM comes configured to accept root SSH access. Create an access key pair, upload the public key to the VM, and ensure you have password-less access.
System Tuning #
A few elements of Photon OS must be modified to ensure that the installation of Kubernetes goes smoothly. They include the IP tables, kernel system control options, and docker.
IP Tables #
Photon OS is lock-down by default, with just port 22 open for SSH connections. Run the following commands to open the required ports for Kubernetes to operate, and to save the updated set of rules so that they become available the next time you reboot the VM.
# ping
iptables -A INPUT -p icmp --icmp-type echo-request -j ACCEPT

# etcd
iptables -A INPUT -p tcp -m tcp --dport 2379:2380 -j ACCEPT

# kubernetes
iptables -A INPUT -p tcp -m tcp --dport 6443 -j ACCEPT
iptables -A INPUT -p tcp -m tcp --dport 10250:10252 -j ACCEPT

# calico
iptables -A INPUT -p tcp -m tcp --dport 179 -j ACCEPT
iptables -A INPUT -p tcp -m tcp --dport 4789 -j ACCEPT

# save rules
iptables-save > /etc/systemd/scripts/ip4save
Kernel Configuration #
You need to enable IPv4 IP forwarding and iptables filtering on bridge devices. Create the file /etc/sysctl.d/kubernetes.conf as follows:
cat /etc/sysctl.d/kubernetes.conf
net.ipv4.ip_forward = 1
net.bridge.bridge-nf-call-ip6tables = 1
net.bridge.bridge-nf-call-iptables = 1
Enable the kernel option changes on the running kernel:
sysctl --system
...
* Applying /etc/sysctl.d/kubernetes.conf ...
net.ipv4.ip_forward = 1
net.bridge.bridge-nf-call-ip6tables = 1
net.bridge.bridge-nf-call-iptables = 1
Docker Cgroup Driver #
Kubeadm uses the systemd cgroup for the Kubernetes control plane services. kubeadm suggests to move docker to use this cgroup as well. The default cgroup for docker in Photon OS is cgroupfs as illustrated below.
docker info | grep -i cgroup
Cgroup Driver: cgroupfs
Run the following commands to update docker’s cgroup:
cat > /etc/docker/daemon.json <<EOF
{
  "exec-opts": ["native.cgroupdriver=systemd"],
  "log-driver": "json-file",
  "log-opts": {
    "max-size": "100m"
  },
  "storage-driver": "overlay2",
  "storage-opts": [
    "overlay2.override_kernel_check=true"
  ]
}
EOF

systemctl daemon-reload
systemctl restart docker

docker info | grep -i cgroup
Cgroup Driver: systemd
Kubeadm #
In this section you install kubeadm and other packages on the master node, and then use kubeadm to install and configure Kubernetes.
The Kubernetes Repository #
You want to configure Photon OS to pull installation packages from the official kubernetes repository. First, download and import the repository’s GPG key:
curl -o /etc/pki/rpm-gpg/GOOGLE-RPM-GPG-KEY https://packages.cloud.google.com/yum/doc/rpm-package-key.gpg
chmod 644 /etc/pki/rpm-gpg/GOOGLE-RPM-GPG-KEY
rpm --import /etc/pki/rpm-gpg/GOOGLE-RPM-GPG-KEY
Now, create the file /etc/yum.repos.d/kubernetes.repo as follows:
cat /etc/yum.repos.d/kubernetes.repo
[kubernetes]
name=Kubernetes
baseurl=https://packages.cloud.google.com/yum/repos/kubernetes-el7-x86_64
enabled=1
gpgcheck=1
repo_gpgcheck=1
gpgkey=file:///etc/pki/rpm-gpg/GOOGLE-RPM-GPG-KEY
Installing Kubernetes #
Run the following commands to install kubeadm, kubectl, and kubelet. kubeadm requires kubelet to be enabled, even if the master node is not going to double-up as a worker node, as in this sample deployment.
tdnf install kubeadm kubectl kubelet
systemctl enable --now kubelet
You can now verify connectivity to the gcr.io registry by pulling the required images.
kubeadm config images pull
W0126 00:02:59.021808     952 validation.go:28] Cannot validate kube-proxy config - no validator is available
W0126 00:02:59.022180     952 validation.go:28] Cannot validate kubelet config - no validator is available
[config/images] Pulled k8s.gcr.io/kube-apiserver:v1.17.2
[config/images] Pulled k8s.gcr.io/kube-controller-manager:v1.17.2
[config/images] Pulled k8s.gcr.io/kube-scheduler:v1.17.2
[config/images] Pulled k8s.gcr.io/kube-proxy:v1.17.2
[config/images] Pulled k8s.gcr.io/pause:3.1
[config/images] Pulled k8s.gcr.io/etcd:3.4.3-0
[config/images] Pulled k8s.gcr.io/coredns:1.6.5
Run Kubeadm #
Finally run kubeadm to initialize the system:
kubeadm init --pod-network-cidr=192.168.0.0/16
...
...
Your Kubernetes control-plane has initialized successfully!

To start using your cluster, you need to run the following as a regular user:

  mkdir -p $HOME/.kube
  sudo cp -i /etc/kubernetes/admin.conf $HOME/.kube/config
  sudo chown $(id -u):$(id -g) $HOME/.kube/config

You should now deploy a pod network to the cluster.
Run "kubectl apply -f [podnetwork].yaml" with one of the options listed at:
  https://kubernetes.io/docs/concepts/cluster-administration/addons/

Then you can join any number of worker nodes by running the following on each as root:

kubeadm join 192.168.1.50:6443 --token eaq5cl.gqnzgmqj779xtym7 \
    --discovery-token-ca-cert-hash sha256:90b9da1b34de007c583aec6ca65f78664f35b3ff03ceffb293d6ec9332142d05
If everything goes well, the kubeadm init command should end with a message similar to the one displayed above. Please note:
- All commands are run as root. The output message tells you how to use the new cluster from a regular user account.
- Take note of the sha256 token value at the end; you will need it on the worker node to join the cluster.
- The
--pode-network-cidrparameter is a requirement for Calico. The 192.168.0.0/16 network is Calico’s default.
Finally, export the kubernetes configuration so that you can keep using the root account with the just-created cluster.
export KUBECONFIG=/etc/kubernetes/admin.conf
The Network Plugin #
Install the Calico network plugin using the following command:
kubectl apply -f https://docs.projectcalico.org/v3.11/manifests/calico.yaml
configmap "calico-config" created
customresourcedefinition.apiextensions.k8s.io "felixconfigurations.crd.projectcalico.org" created
...
daemonset.extensions "calico-node" created
serviceaccount "calico-node" created
deployment.extensions "calico-kube-controllers" created
serviceaccount "calico-kube-controllers" create
Smoke Test #
The kubernetes master node is up and running now! Try the following commands to verify the state of the cluster:
kubectl cluster-info
Kubernetes master is running at https://192.168.1.50:6443
KubeDNS is running at https://192.168.1.50:6443/api/v1/namespaces/kube-system/services/kube-dns:dns/proxy
To further debug and diagnose cluster problems, use 'kubectl cluster-info dump'.

kubectl get nodes
NAME          STATUS   ROLES    AGE   VERSION
kube-master   Ready    master   27m   v1.17.2

kubectl get pods --all-namespaces
NAMESPACE     NAME                                       READY   STATUS    RESTARTS   AGE
kube-system   calico-kube-controllers-5b644bc49c-6sljd   1/1     Running   0          84s
kube-system   calico-node-mbtqw                          1/1     Running   0          85s
kube-system   coredns-6955765f44-qs529                   1/1     Running   0          25m
kube-system   coredns-6955765f44-sr2sv                   1/1     Running   0          25m
kube-system   etcd-kube-master                           1/1     Running   0          25m
kube-system   kube-apiserver-kube-master                 1/1     Running   0          25m
kube-system   kube-controller-manager-kube-master        1/1     Running   0          25m
kube-system   kube-proxy-q46ts                           1/1     Running   0          25m
kube-system   kube-scheduler-kube-master                 1/1     Running   0          25m
The Worker Node #
This section describes how to configure a Kubernetes worker node.
Node Name: kube-node01
Node IP Address: 192.168.1.51/24
Most of the basic VM configuration is similar to that of the master, just with a different IP address. This is the list of steps to follow without further details:
- Install the worker VM using the same Photon OS image.
- Log in and change the root password.
- Upgrade the software.
- Update network connectivity (static IP address, host names, SSH access).
System Tuning #
A few elements of Photon OS must be modified to ensure that the installation of Kubernetes goes smoothly. They include the IP tables, kernel system control options, and docker.
IP Tables #
Run the following commands to open the required ports for Kubernetes to operate, and to save the updated set of rules so that they become available the next time you reboot the VM.
# ping
iptables -A INPUT -p icmp --icmp-type echo-request -j ACCEPT

# kubernetes
iptables -A INPUT -p tcp -m tcp --dport 10250:10252 -j ACCEPT

# workloads
iptables -A INPUT -p tcp -m tcp --dport 30000:32767 -j ACCEPT

# calico
iptables -A INPUT -p tcp -m tcp --dport 179 -j ACCEPT
iptables -A INPUT -p tcp -m tcp --dport 4789 -j ACCEPT

# save rules
iptables-save > /etc/systemd/scripts/ip4save
Kernel Configuration #
Do as you did with the kube-master VM.
Docker Cgroup #
Do as you did with the kube-master VM.
Kubeadm #
In this section you install kubeadm and other packages on the worker node, and then use kubeadm to install and configure Kubernetes.
The Kubernetes Repository #
Do as you did with the kube-master VM.
Installing Kubernetes #
Do as you did with the kube-master VM.
Join the Cluster #
Use kubeadm to join the cluster using the token you got when you run the
kubeadm init command on the master.
kubeadm join 192.168.1.50:6443 --token eaq5cl.gqnzgmqj779xtym7 \
    --discovery-token-ca-cert-hash sha256:90b9da1b34de007c583aec6ca65f78664f35b3ff03ceffb293d6ec9332142d05
This sample command assumes that the token is still valid, but tokens expire after 24 hours by default and then the join operation fails. Run the following commands from the kube-master node to create a new token to use when adding a worker node:
kubeadm token create
W0127 21:34:51.679988   55072 validation.go:28] Cannot validate kube-proxy config - no validator is available
W0127 21:34:51.680069   55072 validation.go:28] Cannot validate kubelet config - no validator is available
fvy60e.x27v7mu26yqe5t8i
If you don’t have the value of --discovery-token-ca-cert-hash, you can get it by
running the following command chain on the master node:
openssl x509 -pubkey -in /etc/kubernetes/pki/ca.crt | \
   openssl rsa -pubin -outform der 2>/dev/null | \
   openssl dgst -sha256 -hex | sed 's/^.* //'
90b9da1b34de007c583aec6ca65f78664f35b3ff03ceffb293d6ec9332142d05
You can now run the join command as follows:
kubeadm join 192.168.1.50:6443 --token fvy60e.x27v7mu26yqe5t8i \
    --discovery-token-ca-cert-hash  sha256:90b9da1b34de007c583aec6ca65f78664f35b3ff03ceffb293d6ec9332142d05
Smoke Test #
The kubernetes worker node is up and running now! Run the following command from
the kube-master node to verify the state of the cluster:
kubectl get nodes
NAME          STATUS   ROLES    AGE     VERSION
kube-master   Ready    master   40m     v1.17.2
kube-node01   Ready    <none>   2m10s   v1.17.2
It takes a few seconds for the kube-node01 node to show up and display the Ready
status.
Hello World #
In this section you run a hello-world application to verify that the new
two-node cluster works properly. All commands in this section must be executed
from kube-master.
Create the hello-node deployment from the Google’s minikube tutorial:
kubectl create deployment hello-node \
    --image=gcr.io/hello-minikube-zero-install/hello-node \
    deployment.apps/hello-node create
deployment.apps/hello-node created

kubectl get deployments
NAME         READY   UP-TO-DATE   AVAILABLE   AGE
hello-node   1/1     1            1           46

kubectl get pods
NAME                          READY   STATUS    RESTARTS   AGE
hello-node-7676b5fb8d-dzfmr   1/1     Running   0          99s
Verify that the application is running using port forwarding:
kubectl port-forward hello-node-7676b5fb8d-htfk2 8080:8080 &
[1] 103287
Forwarding from 127.0.0.1:8080 -> 8080
Forwarding from [::1]:8080 -> 8080

curl 127.0.0.1:8080
Handling connection for 8080
Hello World!

%1
kubectl port-forward hello-node-7676b5fb8d-htfk2 8080:8080
^C
Verify that the application is running using a service:
kubectl expose deployment hello-node --type=NodePort --port=8080
service/hello-node exposed

kubectl get services
NAME         TYPE        CLUSTER-IP     EXTERNAL-IP   PORT(S)          AGE
hello-node   NodePort    10.97.85.161   <none>        8080:32293/TCP   9s
kubernetes   ClusterIP   10.96.0.1      <none>        443/TCP          14h

curl 192.168.1.51:32293
Hello World!
Congratulations! Your new two-node Photon OS-based Kubernetes cluster is up and running!